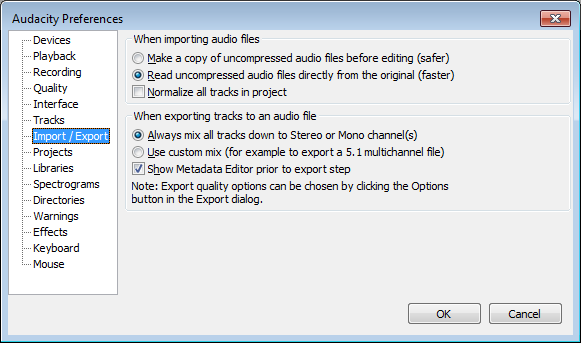
Import / Export Preferences
From Audacity Manual
When importing audio files
Audacity always makes a copy of compressed files like MP3, OGG and FLAC when it imports them. The data is copied either into the temporary folder, or into the _data folder of an open project. Uncompressed files (WAV or AIFF) are very much larger, so may lead to a shortage of disk space if copied in. Audacity therefore allows you to choose from the following two options when importing WAV or AIFF files:
- Make a copy of uncompressed audio files before editing (safer): Audacity makes a copy of all imported file(s), so you can then move, rename or delete them if you wish. Also choose this option if you need to open your Audacity .aup project file on another computer, or send it to someone else. Note: you don't need to choose this option if you are sending an exported audio file like an MP3 to someone else.
- Read uncompressed audio files directly from the original (faster): This is the default option. Audacity reads imported files from the computer folder you first imported them from, without copying them in. Therefore with this option set, you must not move, rename or delete imported uncompressed files, or the folder they are in. The advantage of this option is that long files can be imported in only a few seconds, using On-Demand Loading.
If the waveform has no audio or contains visible gaps after importing files, this usually means that Audacity didn't make a copy of these files and can no longer find the location to read them from. To fix this, open the Dependencies Dialog to view the name and location of the files Audacity is looking for, and restore the files to the path stated in that dialog.
- Normalize all tracks in project: The imported file (in any format) and all audio tracks already on screen will be normalized to your current setting for the normalize effect.
When exporting tracks to an audio file
- Always mix all tracks down to stereo or mono channel(s): This is Audacity's default behavior and means that if your project contains only mono tracks panned to center, they will be mixed upon export to a file containing a single mono channel. The audio will still play equally out of both speakers on most systems. If you have any stereo tracks in your project (or any mono tracks panned away from center) the exported file will be stereo, containing two channels (left and right).
- Use custom mix: When this option is enabled, an Advanced Mixing Options window appears immediately after the completing the File Export Dialog. Advanced Mixing gives you much greater flexibility in mapping your audio tracks to specific output channels in the exported file. In particular it allows export of multichannel files (that is, having more than two channels of audio) in WAV, AIFF, OGG and FLAC formats.
- Show Metadata Editor prior to export step: By default, the Metadata Editor pops up every time you export a file with the or commands. Uncheck this option if you don't want to add embedded information tags to your files.
Users of the previous stable 1.2.x Audacity will recall that bit rate and bit depth for exported files were set on this Preferences tab (which was then called "File Formats"). Now however, you choose export settings for the various formats at the time of export by clicking Options in the File Export Dialog. This saves the separate step of going into Preferences each time you want to to change export settings.


