Metadata Editor
From Audacity Manual
|
|

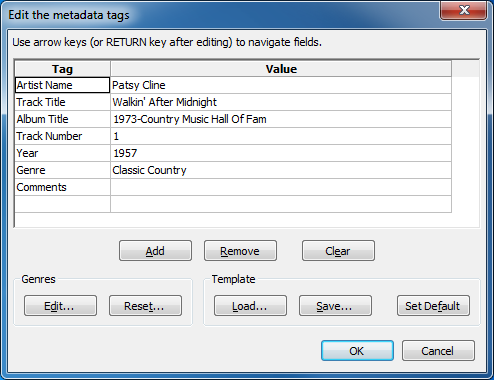
Metadata Editor is used to enter embedded information about an exported audio file (such as artist, year or genre) for display in software applications like iTunes® or Windows Media Player, or portable media players like iPod®. Most exported formats support the default tag names in Metadata Editor, but support in player applications varies from almost universal for MP3, to negligible for WAV.
- Accessed by:

- Metadata Editor appears automatically for all exported files after choosing the file format in the File Export or Export Multiple dialogs. To prevent this, uncheck "Show Metadata Editor before export step" in Import/Export Preferences. You can still enter metadata at any time prior to export by opening Metadata Editor from the File Menu.
- When files are imported, Metadata Editor shows the data for the most recently imported track in the project, not the selected track. If you need the editor to show separate data for each track, import the files into separate projects.
- Use the "OK" button in Metadata Editor to complete the Export. The "Save..." button only saves an optional template of Tag names and values.
Tag and Value fields
- Tag Name: The first seven Tag names are permanent and cannot be edited. You can add more tag rows using the "Add" button (see below).
- Tag Value: Type in the data you want for each Tag. You don't have to fill in all the values. Single-clicking on a value field (or navigating into it with the keyboard <arrow> keys) selects that field - typing will replace the contents. <Tab> can be used too, and also permits navigation into the buttons below the Tag and Value fields.
- Double-clicking a field (or selecting it, then using keyboard <F2>) highlights the text in the field, allowing it to be edited rather than merely replaced. Use keyboard <Home>, <End> or <arrow> keys to navigate to individual characters. Once a value field has been replaced or edited, press the <Return> key to select the next value field, or click in any other one to select it.
The Genre field behaves slightly differently because it contains a drop-down list of genre names. To use this field, double-click it, or use <F2> after selecting it. You may then type a custom genre name. To select from the list, click the downward-pointing arrow to right of the drop-down, or use keyboard <up> or <down> arrow keys. A custom genre typed into the drop-down is not added to the list permanently - use the "Edit" button (see below) to edit the list directly.
- Add: Adds a new, empty row to the list for your own custom Tag (by default there is already one empty row at the bottom of the list). You can select and edit both the name and value fields exactly as above.
- Remove: Removes the currently selected custom row from the list, or the value data only from the currently selected permanent row.
- Clear: Returns the Editor to default state (seven permanent tag names with empty values, plus one empty row).
Genres
- Edit: Edits the drop-down list displayed in the Value field of the Genre tag. The entire list is selected on open. To navigate it for editing, click the required item or use the keyboard arrow keys. To add an entry, hit keyboard <End> then type the name you want. The list will be automatically sorted when saved.
- Reset: Resets the genre list to the default.
Template
- Load: Loads a previously saved list of Tag names and values into Metadata Editor.
- Save: Saves the current list of Tag names and values to a file on your drive.
- Set Default: Makes the current list of Tag names and values the default state when Metadata Editor opens and would otherwise contain empty values. This means that if you import a file containing metadata then open Metadata Editor, the metadata shown will be that for the MP3. If you always want a fixed set of metadata to show when importing a file, you need to save that set as a template and load it.

