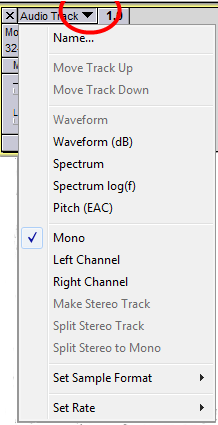
Track Drop-Down Menu
From Audacity Manual
Name...
Displays the "Track Name" dialog where you can give the track a new name. Useful in multi-track projects to keep track of what's on each track.
Moving Tracks
Tracks can be moved up and down using the menu items.
- Move Track Up: Moves track up.
- Move Track Down: Moves track down.
Waveform
This first half of this waveform is a "Chirp" tone which stays at the same amplitude (loudness), as shown by the horizontal top and bottom. The linear scale on the left goes from +1 at the top (the maximum possible loudness without distortion when the signal is positive) to -1 at the bottom (the maximum when it is negative). The horizontal line centered on 0.0 is silence. What you can't see without zooming much further in is that the pitch of this tone is gradually increasing. Zooming would show the individual cycles in the waveform (the positive and negative peaks) occurring much closer together at the end of the sound. The second half of the waveform is the word "Audacity" spoken by a male voice.
This image is a waveform view of an extremely short chirp, one tenth of a second, with only a few cycles, where the pitch increases very rapidly. As it's so short, we can zoom in to show the closer spacing of the cycles as the frequency (and hence the pitch) increases from left to right.
Waveform (dB)
This is the same chirp and word as in the first Waveform image, but in this view the vertical scale is in dB. This is a logarithmic method of displaying the amplitude. It gives a better representation of the sound we hear, because this scaling gives better detail for the fainter sounds. It also shows more clearly than the waveform view how the energy of the "Audacity" word is naturally concentrated in the central "dac" part, and weakest at the end.
Spectrum
This view of the same chirp and word shows how the amount of energy in different frequency bands changes over time. Higher frequencies are at the top of the scale, lower frequencies at the bottom. The blue color is the least energy and the red and white are the most. The progressive increase of pitch in the chirp tone is vividly demonstrated by the upward sloping diagonal line. Spectrum view also confirms that the "Audacity" word has most energy in the middle of the word.
Spectrum log(f)
This view is the same as the Spectrum view except that the vertical scale is logarithmic.
Pitch
Highlights the contour of the fundamental frequency (musical pitch) of the audio, using the Enhanced Autocorrelation (EAC) algorithm.
The EAC Algorithm was developed to produce a mathematical representation of the changes of pitch in a piece of audio. The aim was to allow automated comparison of sound files so that two versions of the same tune could be recognized as being similar, even if played in different keys, or on different instruments.
- Here is the spoken word "Audacity" in Pitch view:
- Here is a two-octave scale from middle C played on the piano.
Splitting and Joining Channels
- Mono, Left Channel and Right Channel Mainly used on multiple single channel files (ones that are not the split left and right channels of a stereo pair) so as to mix to a final stereo track. "Mono" feeds the output of that track to both left and right speakers on most two channel systems; "Left Channel" and "Right Channel" feed it only to that respective speaker. Currently Audacity does not support multi-channel playback.
- Make Stereo Track Use this command on the upper of two adjacent, single channel tracks which you want to join into one stereo track. The upper track will become the left channel of the new stereo pair, and the lower the right channel. The tracks do not need to be selected with the mouse or keyboard before this process, and either can be mono, left or right before joining to stereo.
- Split Stereo Track splits the two channels of a stereo pair into separately editable left and right channels, left above the right. If you are mixing multiple single channel files, you might want to use the "Split Stereo to Mono" command noted below then use the pan slider on the Track Panel. This will give you more control over the pan than leaving the tracks as left and right channel.
- Split Stereo to Mono splits the two channels of a stereo pair into separately editable mono channels.
Set Sample Format
Change the sample format of the track to 16-bit integer PCM, 24-bit integer PCM or 32-bit floating point. The numbers representing each sample in the waveform will be recalculated.
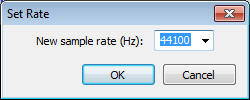
Set Rate
Change the sample rate of the track. This does not resample the track, so changing the sample rate will change the speed at which the track plays back. Useful if you imported a track that had no sample rate tag or was tagged with the wrong rate and was thus playing back at the wrong speed.
If you want to change the sample rate of a track without changing the speed use the Resample command in the Tracks Menu.


