Analyze Menu
From Audacity Manual
Contrast ...
Contrast Analysis is designed to analyze a single mono or stereo speech track to determine the average rms difference in volume (contrast) between foreground speech and background music, audience noise or similar). The purpose is to determine if the speech will be intelligible to the hard of hearing. Note that if you have multiple tracks open, Contrast Analysis will calculate rms values based on all of the tracks, whether they are selected or not.
To use Contrast Analysis, click on the menu item, then:
Step One:
- Select a region containing the speech (this is the "foreground" selection)
- Click on the "Measure selection" button in the 'Parameters' box in the "Foreground:" row; the start and end times of the selection will be displayed
- The average rms of the selected foreground audio will be displayed in the "Volume" box at the end of the row
Step Two:
- Select a region containing only the background sound (this is the "background" selection)
- Click on the "Measure selection" button in the 'Parameters' box in the "Background:" row ; the start and end times of the selection will be displayed
- The average rms of the selected background audio will be displayed in the "Volume" box at the end of the row
Result:
- Contrast Result: Shows if the difference between foreground and background gives a pass or fail against the "WCAG 2.0, Success Criteria 1.4.7" guideline for accessible audio. A pass is given if the difference is 20 dB or more.
- Difference: The actual average rms difference value found
- Reset: Clears all the parameters and result values
- Export: Saves the foreground/background values and the result to a text file for proof that you checked your audio file. If you export again to the same file, the new result will be appended underneath the previous one.
- WCAG2 Help: Links to an external illustrated tutorial for this tool
- Close: Closes the Contrast Analysis window, retaining foreground/background and result values for the duration of the Audacity sesssion
Plot Spectrum...
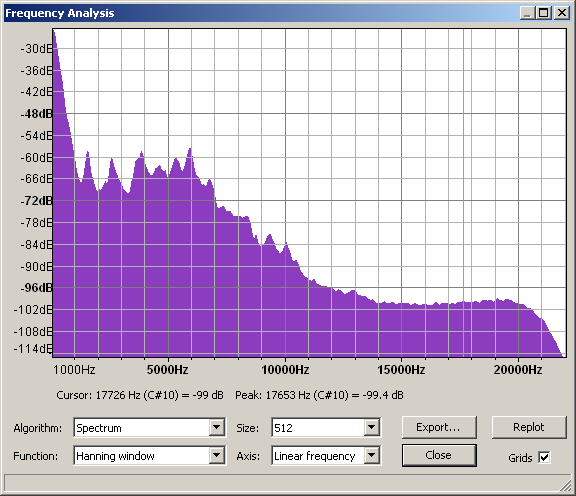
This takes the selected audio (which is a set of sound pressure values at points in time) and converts it to a graph of frequencies against amplitudes. This is done using a mathematical algorithm known as a Fast Fourier Transform or FFT. This gives a value for each narrow band of frequencies that represents how much of those frequencies is present. All the values are then interpolated to create the graph.
Plot Spectrum take the audio in blocks of 'Size' samples, does the FFT, and averages all the blocks together.
There is an audio version of the Uncertainty Principle that says "Frequency_Resolution*Time_Resolution = 2." The PlotSpectrum tools lets you choose the FFT size which is the number of consecutive audio samples to be analyzed. If you choose 1024 samples, you will get 512 frequency bins covering the frequency range up to half the sampling frquency. Most projects use 44.1kHz sampling frequency. Thus, in this example, Time_Resolution = 1024/44.1 = 23.2 milliseconds and the frequency resolution is 44100/2/512 = 43 Hz.
Another PullDown is Function which offers choices like Rectangular, Hanning, Hamming, and others. We suggest you use Hanning (actually it is a Hann window, but Hanning is widely accepted) for most situations. The fundamental principle at work here is that the way we observe our data changes what we see. The "true spectrum" of your project would be computed over the entire project and would provide very detailed frequency resolution but essentially no time resolution at all. In other words, this "true spectrum" would offer an average frequency distribution over the entire project. If we select a short interval of audio, the short-time spectrum has frequency resolution limited by the observation window time AND the result is affected by the spectrum of the window itself. For general audio analysis, the Rectangular window is least desirable, and the other options offer slightly different effects.
Note that currently only the first 237.8 seconds of selected audio can be analyzed.
The following controls let you configure the way the plot is calculated and displayed:
Algorithm
Determines what type of processing is done on the audio data.
- Spectrum: (default) - Plots the FFT of the data as described above.
- Autocorrelation: These options measure to what extent the sound repeats itself. This is done by taking two copies of the audio, and moving one forward by one sample. The two copies are then multiplied together, and all the values added up. This is repeated for two samples difference and so on, up to the number of samples in the size option. This gives a small result if the waveform is random (for example, noise) and a large result if it is repetitive (like a musical note). By looking at the peaks in the plot, the key frequencies present can be determined even if there is a lot of noise.
- Cepstrum: The cepstrum of an audio signal is related to the spectrum, but presents the rate of change in the different spectrum bands. It's particularly useful for properties of vocal tracks and is used, for example, in software to identify speakers by their voice characteristics.
Size
This controls how many frequency divisions are used for the spectrum, or how many samples are used for autocorrelation. In Spectrum, a larger size gives more accurate frequency resolution (narrow bands), but averages the result over a longer period of time (because more samples are needed for the calculation). In Autocorrelation, a larger size looks for repeating patterns over a larger range of time offsets, and so will detect lower frequency patterns. With either algorithm, Audacity will show a warning if the selected region is too short for the chosen size.
Export ...
Exports the spectrum to a text file. You could open this text file in another program for further analysis.
Replot
Allows you to replot the spectrum when the selection changes.
Function
Selects which mathematical function is used to pre-process the data. The basic forms of the FFT and autocorrelation algorithm require infinitely long sections of audio to work on, and so take infinitely long to complete. Hence the available audio must be faded in and out so that the finite length of the audio has minimum effect. The available functions are known as "windows" and fade in and out using different methods. There is a trade-off between frequency resolution and spillage from one frequency band to another.
- Rectangular: is the simplest - it just cuts off the given block of samples with a sharp cut (no fading), and so leaves a sharp click at each end of the data. This means that you get a lot of spillage into other frequency bands. Not a good plan.
- The rest fade in and out using various methods. The default (Hanning) is a good compromise, although opinions vary.
Axis
When using the Spectrum, the frequencies can be displayed on a linear scale (default, which gives equal width to each increment on the scale) or on a logarithmic scale.
Grids
Turn the measurement grids on and off.
Find Clipping...
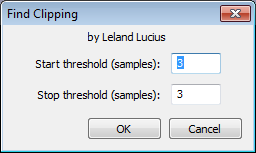
Looks for runs of clipped samples and displays them in a Label Track, as a screen-reader accessible alternative to . The number of samples for the "Start threshold" and "Stop threshold" is configurable, and set to three by default. The "threshold" is the number of contiguous clipped samples that must be present before they will be labeled as a run. The Start threshold therefore means the number of clipped samples that must be present to left of a non-clipped sample before it will be labeled as an individual run, and Stop threshold the number that must be present to right of a non-clipped sample before it will be labeled as an individual run. Note that unlike "Show Clipping", "Find Clipping" is not automatic, so after any editing that affects volume, or after import or recording of a new track, Find Clipping must be run again.
Each individual run of clipped samples is marked in the format "number of number". For example, "11 of 11" means there are 11 samples in this run of clipped samples and all of them are clipped, while "9 of 11" means only nine samples in the run of 11 are clipped. Note that in the case of a stereo track, each channel will have its own label, so if at one point both channels are clipped, two labels will appear above each other.
Beat Finder...
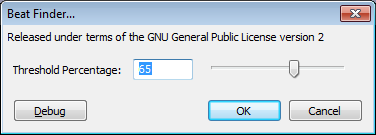
Beat Finder attempts to place labels at beats which are much louder than the surrounding audio. It's a fairly rough and ready tool, and won't necessarily work well on a typical modern pop music track with compressed dynamic range. If you don't get enough beats detected, try reducing the "Threshold Percentage" setting.
Regular interval labels...
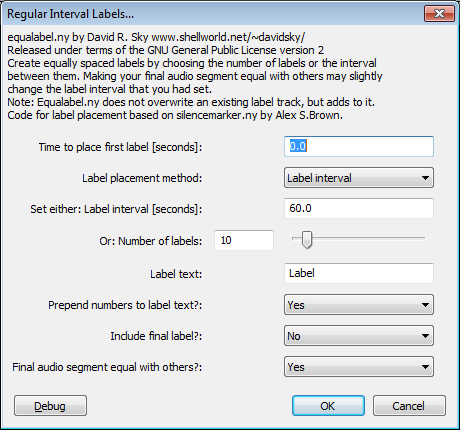
This places labels in a long track so as to divide it into smaller, equally sized segments. For example, you may want to break up a long file into smaller audio files for distribution on the internet. The labels can contain the name of the separate files, then will export all the files in one process based on the label points. You can either choose the number of labels to be created, or the interval between them.
Sample Analyze Nyquist Plug-in
This is an example of a Nyquist analyze plug-in. All it does is put labels at the start and end of the selection. If you are interested in writing Nyquist analyze plug-ins, this provides a simple starting point. Open the "analyze.ny" file (found in the "plug-ins" folder) in a text editor to see the Nyquist code. For more information on the Nyquist programming language and how to use it within Audacity, see Audacity and Nyquist and Nyquist in Audacity.
Silence Finder...
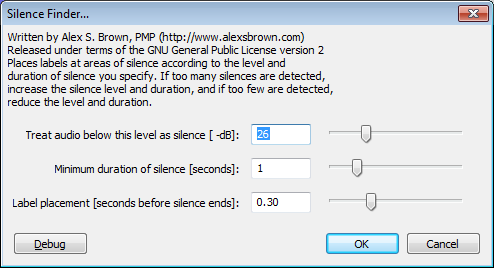
This also places labels in a track to divide it up, but does so at areas of silence according to the level and duration of silence you specify. This is very useful to break up a long recording such as from an LP or cassette into individual tracks. The labels can contain the name of each track, and then will export audio files in one process corresponding to each track of the recording. If too many silences are detected, increase the silence level and duration; if too few are detected, reduce the level and duration.
Sound Finder...
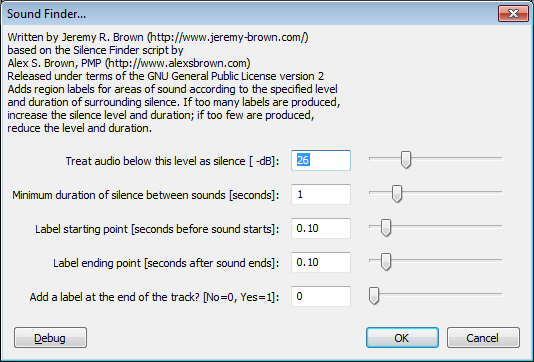
Similar to the Silence Finder command, this also places labels in a track to divide it up, but places region labels instead of point labels, labelling the "chunks" of sound rather than the silent points. Again, this is useful to break up a long recording such as from an LP or cassette into individual tracks, but provides a way of excluding the silences between tracks without having to remove them manually. The labels can contain the name of each track, and then will export audio files in one process corresponding to each track of the recording. If too many "chunks" of sound are produced, increase the silence level and duration; if too few are produced, reduce the level and duration.
