Tutorial - Your First Recording
From Audacity Manual
Step 1: Plug in your input source
Identifying the sound ports on your computer
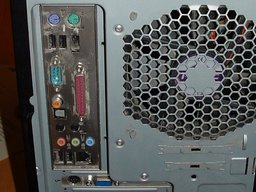
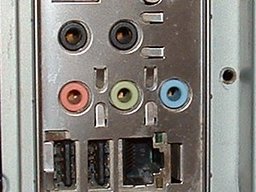
First of all you need to know the sound input capabilities of your computer. Most desktop PCs (Windows and Linux) will have sound ports on the back of the computer similar to these illustrations.
| 
| |
| The rear of a typical PC | The color-coded jacks on the sound card |
The red port is normally the microphone input, and is usually mono but might be stereo. The blue port is normally the line input port and is usually stereo. The green port is normally the headphone output port, also usually stereo. Check your computer manual to be sure.
PC laptops vary widely in the types of sound input and output ports they provide, where they are on the laptop, and how they are labelled. Again, check your computer manual to be sure of the capabilities of your laptop, where the ports are and how they are labelled.
Macs do not generally have a microphone input port.
| 
| |
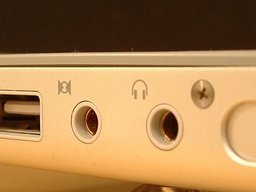
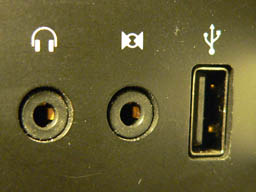
| Audio connections on a PowerBook | Audio connections on an iMac |
In these illustrations of sound ports on Macs, the round port with the headphone symbol is the Line Output port. The round port beside the headphone port is the line input port.
Other Macs (Mini, Mac Pro, MacBook and MacBook Pro) are similarly equipped. Check your manual for the locations and labelling of these ports.
Identifying various cables and plugs
The terms "jack", "socket" and "port" are often used interchangeably. These all refer to something that a plug plugs into. Plugs plug into jacks, plugs plug into sockets, and plugs plug into ports.
In this tutorial we will refer to sockets on a computer as ports, and sockets on audio equipment as jacks. This is consistent with common usage. A guitarist will plug into the jack on their amplifier, a computer user will plug their USB device into the USB port on their computer.
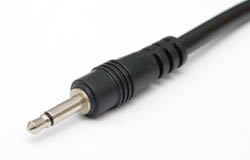
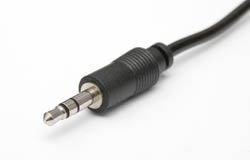
On virtually all computers the audio ports will be of a type referred to as 1/8", 3.5mm or mini-plug. Here's what these plugs look like.
| 
| |
| A mono mini-plug | A stereo mini-plug |
Audio equipment may also use mini-jacks. Quite often the headphone output on portable equipment such as an iPod or Walkman will be a stereo mini-jack.
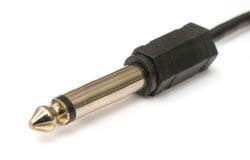
Audio equipment may also use the larger 1/4" jacks and plugs.
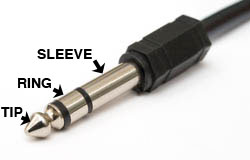
| 
| |
| A mono 1/4" plug | A stereo 1/4" plug |
Stereo 1/4" jacks are often found on the front panels of non-portable (home) audio equipment such as home theatre receivers and cassette decks. They may also be found on DJ mixers and professional keyboards.
Electric guitars and amplifiers are equipped with 1/4" mono jacks.
Tip, Ring and Sleeve
The parts of a stereo or mono plug, either 1/8" or 1/4", are identified by the terms "tip", "ring" and "sleeve" as shown in the illustration above. A mono plug has no ring. Thus you may encounter the terms "TRS plug" or "TRS jack". In stereo operation the tip connects to the left channel signal, the ring to the right channel signal, and the sleeve to ground.
Connecting a microphone to your computer
If your computer has a microphone input port
You're all set. Just plug a compatible microphone into the microphone input port on your computer.
What do we mean by compatible? Any microphone with a permanently attached cord that ends in a mini-plug should work. Note that many sound cards provide battery voltage for mono electret microphones on the ring of a stereo mini-plug. Check your computer manual to be sure if this feature is provided. If it is, be sure to use a microphone that is designed to accommodate this.
A computer headset-mic combination is pretty much guaranteed to work. These microphones are not the highest quality, but can be had fairly inexpensively. If you're just getting started and want to experiment without spending a lot of money, one of these would be a good choice. Just don't be surprised if your recorded voice sounds a bit tinny or flat.
Desktop-standing microphones can be had for at little as $10 or as much as $500. Choosing a microphone is beyond the scope of this tutorial. Try searching the web for "computer microphones", visit your local computer store, talk to your friends, or ask questions on the Audacity Forum.
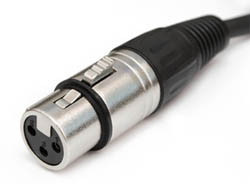
Unless you are prepared to spend extra money for a microphone pre-amp or standalone mixer do not buy a microphone with an XLR connector:
| |
| An XLR plug |
If your computer does not have a microphone input port
Do not plug a microphone into the line input port on your computer. The volume will be way too low (the line input port does not apply the needed amplification to boost the very quiet signal from the microphone). You won't break anything, but you will be very frustrated with the results.
Option 1 - Buy a microphone to USB adapter
These devices plug into a USB port on your computer, and have a microphone input jack (usually 1/8").
Some options are the Griffin iMic, the M-Audio Transit USB and the Edirol UA-1EX.
You will still need a compatible microphone. Be sure to carefully read the specifications of any adapter you are considering and make sure you get a microphone that will work with that interface.
Option 2 - Buy a USB microphone
These microphones are becoming more common. They combine a microphone and the USB adapter all in one package.
Models are available by Logitech, Samson, Nady and Audio-technica, among others.
Option 3 - Buy a mixer
This may be the most expensive option but in the long run will provide the most flexibility.
Any inexpensive DJ mixer should include a microphone input. The electronics in the mixer will boost the microphone signal, and the output of the mixer will be connected to the line in port on your computer. The DJ mixer will also have inputs for turntables so you can use it record your LPs in preparation for converting them to CD. The DJ mixer will most likely have line level inputs as well, so you could connect a cassette deck or other line level source to the mixer.
Another option is a small inexpensive microphone and line level mixer. Note that these mixers do not usually include inputs for turntables.
When purchasing a mixer make sure to also buy a microphone that is compatible with the mixer. Unless you are sure of what you are doing it is probably best to visit your local music store. Don't let them sell you a $1000 DJ mixer and $500 microphone - unless you are a professional DJ you don't need equipment at that level.
The advantage of a mixer is that you can connect all your audio sources to the mixer then connect the mixer to your computer. No need to be constantly re-plugging things at the back of your computer.
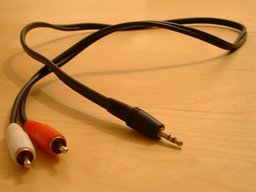
To connect the mixer to your computer you will need a dual-RCA to stereo mini-plug cable like this one:
| |
| Dual-RCA to mini-plug cable |
Plug the RCA plugs into the RCA output jacks on the back of the mixer. Plug the stereo mini-plug into the line input port on your computer.
Connecting a keyboard to your computer
If the keyboard has RCA jacks on the back then the best way to connect it is with a cable with a dual RCA to stereo mini-plug cable as shown above, plugged from the RCA output jacks on the back of the keyboard to the line input port of the computer.
If the keyboard doesn't have RCA output jacks but does have a 1/8" stereo headphone jack, the easiest way to connect it is with a cable with a stereo mini-plug on each end, plugged from the headphone output of the keyboard to the line input port of the computer.
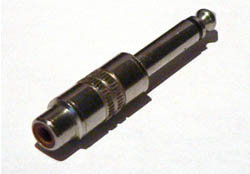
If the keyboard has 1/4" jacks on the back (usually provided to connect the keyboard to a guitar amplifier) you will need to create an adapter cable using a dual RCA to stereo mini-plug cable, and two RCA to 1/4" adapters.
| |
| An RCA to 1/4" adapter |
Plug the RCA plugs into the RCA jacks on the adapters - you now have a dual 1/4" to stereo mini-plug cable.
Connecting a guitar to your computer
Generally the output level from an electric guitar is sufficient to drive the line input port on a computer. You will need an adapter cable that goes from a 1/4" mono plug (to plug into the guitar) to a mono mini-plug (to plug into the computer line input port).
You probably have a guitar cable for plugging the guitar into an amp, and you may be tempted to buy a 1/4" to 1/8" adapter, plug one end of your guitar cable into the adapter and then plug the adapter into the line input port - don't do this! This creates a heavy, stiff cable hanging off the back of your computer - the slightest tug in the wrong direction could damage your sound card! A better solution is to find a 1/4" mono to 1/8" mono shielded cable that is light and flexible.
Testing your input connection
Before you fire up Audacity you should use your computer's sound control panel to choose the sound input that you want Audacity to hear. Once you have verified that you are getting sound into the computer you can move on to getting that sound into Audacity.
If you are having trouble getting sound into Audacity there's lots of help available on the Audacity Wiki.
Step 2: Configure Audacity to record from that device
Now that you know you're getting sound into the computer, it's time to fire up Audacity.
Click on to bring up the Preferences dialog. Click on the Devices tab. Under Recording, make sure that the device you selected in your computer's sound control panel corresponds to what is displayed in the "Device" popup menu - if not, click the Device popup menu and the select the option that corresponds to the setting you made in your computer's sound control panel. In the "Channels" popup menu choose whether you want to record in mono (1 channel) or stereo (2 channels). In general if you are recording a microphone or guitar you will want to record in mono. If you are recording a keyboard and the keyboard has stereo outputs you will want to record in stereo. For the sake of this tutorial though, we assume that you have set the "Channels" popup menu to mono.
Now go to the Recording tab of the Preferences dialog. If you are recording from a microphone, make sure that "Software Playthrough" is not checked - Software Playthrough will cause undesirable feedback from the computer speakers to the microphone. If you are recording a guitar or keyboard and want to hear the instrument through the computer speakers, make sure that "Software Playthrough" is checked.
Click the "OK" button to accept the settings you just made.
Step 3: Set levels and do a test recording
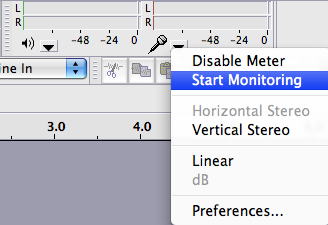
Click on the downward pointing arrow beside the microphone symbol under the recording VU meters and select "Start Monitoring".
Talk or play at a normal volume and watch the recording VU meter.
Adjust the recording volume with the recording level control.
Note that if you are using a USB microphone or USB microphone adapter the recording volume control may have no effect. If you cannot get a "good" reading on the recording meter (doesn't get close to the right edge - too quiet; or goes all the way to the right edge - too loud), go back to your system sound control panel and adjust the volume there.
You are now ready to do a test recording.
Get everything ready (microphone in place, guitar in hand) and click the Record button ![]() in the Transport Control toolbar. Record for few seconds while talking or playing, then click the Stop button
in the Transport Control toolbar. Record for few seconds while talking or playing, then click the Stop button ![]() .
.
Have a look at the recorded waveform - there should be no clipping visible. Clipping is bad - this is when the volume of the source that was sent to Audacity is louder than Audacity can record. The result is that the tops and bottoms of the recorded wave are chopped off ("clipped"). The illustrations below show a properly-recorded waveform and a clipped waveform.
| A properly recorded waveform |
| A clipped waveform |
You can also check for clipping by clicking on . Audacity will display vertical red bars in the waveform wherever it detects clipping.
Click on to remove the test recording.
If clipping occurred turn down the recording level a bit and try again. If no clipping occurred you are ready for the real thing!
Step 4: Full Recording
Click the red Record button in the Transport Control toolbar then begin talking or playing. Continue for as long as you want. When you feel you've recorded enough, click the Stop button.
Step 5: Edit Recording
You now have a good recording, but there are likely some bits at the beginning and end that you don't need - between the time you clicked the Record button and the time you starting talking or playing, and between the time you stopped talking or playing and the time you clicked the Stop button.
- Click the Skip to Start button
 in the Control toolbar
- Repeatedly click the Zoom In button
 until the displayed waveform expands so you can see from the beginning of the recording to the time you started talking or playing
- With the Selection tool, click just before the point where you started talking or playing
- Click on
- The region from the beginning of the track to the beginning of your performance is selected
- Click on
- The selected audio is removed from the track, and the rest of the audio moves left to fill the space left after the delete.
Similarly, you can delete the extra bit from the end of your recording.
- Click the Skip to End button
 in the Control Toolbar
- Repeatedly click the Zoom In button until the displayed waveform expands so you can see from the time you stopped talking or playing to the end of the recording
- With the Selection tool, click just after the point where you stopped talking or playing
- Click on
- The region from the end of your performance to the end of the track is selected
- Click on
- The selected audio is removed from the track
If you've made any mistakes in your performance you could edit them out. Use the Selection Tool to select each mistake and press the delete key. Listen back to each edit to make sure it sounds natural. If not, click on and try again.
Since you were so careful not to record too loud it is likely that your recording is not as loud as possible. To correct this you can use the Amplify choice in the Effect Menu.
- Click on
- The entire track is selected
- You need to have some audio selected before you can apply an effect
- Click on
- The Amplify dialog appears
- Accept (for now) the default choices in this dialog and click the "OK" button
- The volume of your recording is maximized.
Note that Amplify will retains any volume differences between channels of a stereo track. If you need to remove any unintended volume differences between the left and right channels (i.e. the recording is not balanced correctly) that can often occur with basic equipment you will need to use instead. One problem can be that a loud click in one channel can cause Normalize to create an unwanted change in the stereo balance. In that case you should consider removing the click before the Normalize step, using Click Removal. For more information about the difference between the Amplify and Normalize effects see this page on the wiki.
Step 6: Save and Export
Click on , choose a name for your project and a place to save it.
You have now saved an Audacity Project to disk. The project file (ending in .aup) can only be opened by Audacity. You can come back to the project and make changes to it later. For example you could do more editing, record more audio, or apply other effects.
In order to listen to your performance in other audio software (such as iTunes or Windows Media Player), or to burn it to CD, you need to export your project.
If you want to export your project the details are at File Menu > Export...
Where to go from here
Congratulations! You have successfully recorded, edited and saved your first recording.
Take some time to play with Audacity. Record and edit more stuff. Practice editing. Try out different effects.
Tutorials
For more information
- Getting sound into Audacity: Audacity Wiki - Troubleshooting Recordings
- Improving Recording Quality: Audacity Wiki - Improving Recording Quality
- Editing a track: Edit Menu, Zooming
- Effects: Effect Menu
- Saving: Audacity Projects
- Exporting: File Menu > Export...
If you need help and can't find it in the manual or the wiki, try visiting the Audacity Forum.
