Recording Quality
From Audacity Manual
There are many factors that will affect the quality of any recordings you make. Factors like performance and environment are beyond the scope of this manual, but they should not be ignored.
Contents |
Inside the Computer (including external audio devices)
The biggest factor for making a digital recording is often the Analog to Digital Converter or ADC. In a computer system, this piece of equipment is often called a sound card. Sound cards that are integrated into a computer's motherboard are ubiquitous now, but have a poor reputation for recording quality. Anyone who wants to make high quality recordings should seriously consider using a higher-quality sound card, but for many users the motherboard sound card might well be acceptable.
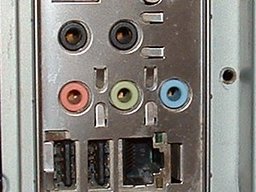
A typical Sound Card has three or more ports, often color-coded (though not universally). Each of these ports has a different purpose and it's up to the user to select the right port to plug their audio equipment in to.

Typical Sound Card with 5 ports.
- Black = Surround Sound Outputs
- Red = Mic In
- Green = Line Out
- Blue = Line In
If this picture does not look familiar, or your sound card uses different color codes, refer to the documentation that came with your sound card.
Mic In
Generally the Mic In port on a computer is only meant to have a small computer microphone plugged into it. If you have a microphone with an 1/8" (3.5mm) 3-conductor jack plug, it will probably work if plugged into this port.
Line In
The Line In port is the highest quality input available on most sound cards (like the one pictured above). It expects to have a Line level signal plugged into it, this is the same level used by most consumer-oriented audio equipment. Equipment such as tape decks, record players, MiniDisc players, Video Game Systems and so on should be plugged into this port.
Recording Level
In the world of digital audio, it is important to record a signal at a sufficiently high level in order to avoid a recording with a high noise floor. ///Audacity provides controls to adjust the level of the signal being recorded///. In order to record the best possible signal, this volume level should be adjusted to record at the highest level possible, without clipping the signal. Clipped signals will be distorted and are not generally fixable, so finding the delicate balance between "loud enough" and "too loud" is important.
We recommend setting the recording volume so that the highest peak of a recorded signal will reach about -6 dB away from clipping. -6 dB is equivalent to a height of 0.5 on Audacity's default waveform display.
The easiest way to adjust this slider is to make a test recording with a loud input signal. While the test signal is recording, adjust the input volume slider so that the peaks of the audio never go higher than 0.5 in the track display.
Maximizing The Level
Since you were so careful not to record too loud it is likely that your recording is not as loud as possible. If you require to correct this you can use the Amplify choice in the Effect Menu.
- Click on
- The entire track is selected
- You need to have some audio selected before you can apply an effect
- Click on
- The Amplify dialog appears
- Accept (for now) the default choices in this dialog and click the "OK" button
- The volume of your recording is maximized.
Note that Amplify will retains any volume differences between channels of a stereo track. If you need to remove any unintended volume differences between the left and right channels (i.e. the recording is not balanced correctly) that can often occur with basic equipment you will need to use instead. One problem can be that a loud click in one channel can cause Normalize to create an unwanted change in the stereo balance. In that case you should consider removing the click before the Normalize step, using Click Removal. For more information about the difference between the Amplify and Normalize effects see this page on the wiki.

