Mixing
From Audacity Manual
Mixing refers to the process of combining multiple tracks of simultaneous audio into a single recording. For example, you could mix speech with background music, or you could mix different instruments playing the same song. Concatenating two songs, for example playing three songs in sequence, does not necessarily involve mixing, but if you want the songs to fade between each other, then it would involve mixing.
Once audio has been mixed, it's essentially impossible to separate out the original parts again. It's kind of like trying to take the banana out of a banana milkshake after you've already put it through the blender - it's too late. There are a few occasions when it actually is possible to separate sounds a bit - you can sometimes isolate the bass, or the lead vocals, or remove background noises. But these processes are tricky and they don't always work well, and they usually cause some quality loss. So remember, as long as the multiple tracks are inside an Audacity project, you can manipulate them independently - but once you've exported to an MP3 or to an audio CD, you can't expect to separate the different parts again. So keep your Audacity project around if you plan to continue editing!
The most important thing to remember in Audacity is that mixing is automatic. You don't need to tell Audacity to mix, just put things into two different tracks and Audacity automatically mixes them. The controls you use for mixing are the Mute and Solo buttons, and the Gain and Pan sliders.
Muting and Soloing
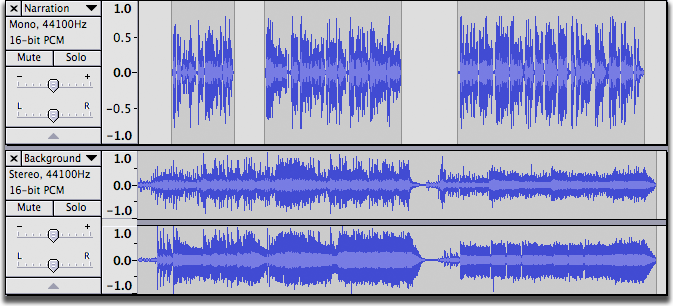
When working with multiple tracks, it's very important to be able to hear just one at a time sometimes. Each track has a Mute and a Solo button, allowing you to temporarily hear just some of your tracks - see the figure above
-
 Mute causes a track to be silenced. More than one track can be muted.
-
 Solo behaves in one of two ways depending on the setting made in Tracks Preferences.
- 1) Silences all of the tracks except the ones being soloed. More than one track can be soloed, and soloing overrides muting.
- 2) Only one track can be soloed at a time. Soloing still overrides muting.
You can press the Mute and Solo buttons while tracks are playing.
If you're using the keyboard, SHIFT+U toggles muting on the currently focused track, and SHIFT+S toggles soloing.
Gain and panning
Each track has a gain control, which adjusts the track's volume, and a pan control, which adjusts the track's stereo position - whether it comes from the left speaker, right speaker, or in-between. To change the value, just click on the slider and drag. The normal range of gain is from -36 dB to 36 dB. If you need more, choose Amplify from the Effect menu. For more fine control over the gain, hold down Shift while dragging, or double-click on the gain control.
If you're using the keyboard, hold down Alt and Shift to adjust the gain and pan for the focused track. Up and Down affect the volume, while Left and Right affect the panning. Or press Shift+G to adjust the gain in a dialog box and Shift+P to adjust the panning.
If you don't see the gain and pan controls for a track, you may need to resize it to make it bigger. Position the mouse on the bottom edge of the track and drag it down to make the track bigger.
Explicit Mixing and Rendering
While mixing is automatic, there are times when you may want to explicitly tell Audacity to mix several tracks. This is very useful if you end up with too many tracks and they're getting hard to work with. Or sometimes you want to see what the final mix will look like as a waveform.
To do this, select all of the tracks you want to mix together, and choose Mix and Render from the Project menu - to learn how to select multiple tracks, see Audacity Selection. Several things happen when you choose Mix and Render:
- All selected tracks are mixed down to a single new track. In most cases, this will be a stereo track.
- If any of the original tracks did not match the sample rate of the project (set in the lower-left corner of the window in the Selection Bar), they will be resampled to match that sample rate.
- Any amplitude envelope effects will be applied and the envelope will be reset to normal.
- Gain and panning changes will be applied and reset back to normal in the mixed track.
You can always undo if you're not happy with the results of Mix and Render, of course, then make changes and try it again.


